Understanding Write Protection
Write protection can be enabled in several ways:
- Hardware Lock: Many SD cards and some USB drives have a physical switch to enable or disable write protection.
- File System Settings: Certain file system settings or attributes can make the drive read-only.
- Registry or System Policies: Operating systems may impose write protection due to settings or corruption.
- Drive Errors: Issues like bad sectors or file system corruption can trigger write protection.
Data Implications
Removing write protection typically does not affect the existing data on the drive. However, some methods (e.g., reformatting) will erase all data. Always back up important files before proceeding.
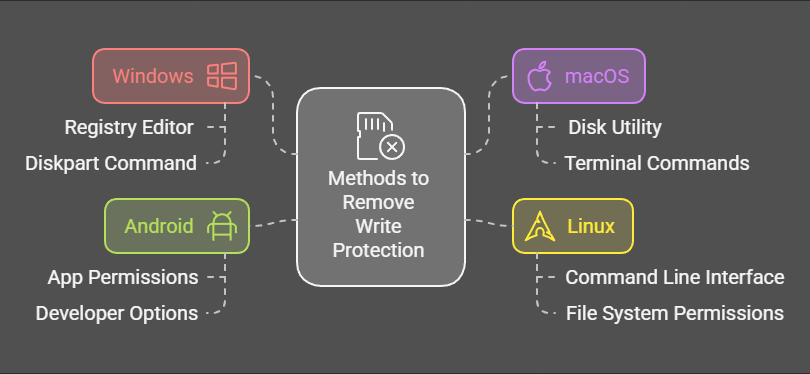
Methods to Remove Write Protection
1. For Windows
Method 1: Check the Hardware Lock
- Inspect the SD card or USB drive for a physical write-protection switch.
- Slide the switch to the ‘unlocked’ position.
Method 2: Use Diskpart Command
- Connect the drive to your PC.
- Press
Win + R, typecmd, and press Enter. - In the Command Prompt, type
diskpartand press Enter. - Type
list diskto view all connected drives. - Identify your drive and type
select disk X(replace X with the drive number). - Type
attributes disk clear readonlyand press Enter. - Type
exitto close Diskpart.
Method 3: Modify the Registry
- Press
Win + R, typeregedit, and press Enter. - Navigate to:
HKEY_LOCAL_MACHINE\SYSTEM\CurrentControlSet\Control\StorageDevicePolicies. - Double-click on
WriteProtectand set its value to0. - Restart your computer.
Method 4: Reformat the Drive
- Right-click on the drive in File Explorer and select ‘Format’.
- Choose the desired file system and uncheck ‘Quick Format’ for a thorough format.
- Warning: This will erase all data on the drive.
2. For macOS
Method 1: Check File Permissions
- Connect the drive to your Mac.
- Right-click on the drive in Finder and select ‘Get Info’.
- Check the permissions under ‘Sharing & Permissions’.
- Ensure your user account has ‘Read & Write’ access.
Method 2: Use Disk Utility
- Open Disk Utility (search for it using Spotlight).
- Select your drive from the sidebar.
- Click on ‘First Aid’ to repair the drive.
- If repair fails, click ‘Erase’ to reformat the drive.
- Warning: Reformatting will delete all data.
Method 3: Terminal Command
- Open Terminal.
- Type
diskutil listto identify your drive. - Use
diskutil unmountDisk /dev/diskX(replace X with the drive identifier). - Type
sudo chmod -R u+rw /Volumes/YourDriveNameto grant write permissions.
3. For Linux
Method 1: Check the Hardware Lock Ensure the physical write-protection switch is disabled.
Method 2: Modify Drive Attributes
- Open a terminal and type
lsblkto identify the drive. - Unmount the drive using
sudo umount /dev/sdX(replace X with the drive letter). - Clear write protection with
sudo hdparm -r0 /dev/sdX.
Method 3: Reformat the Drive
- Open GParted or a similar partition manager.
- Select the drive, delete existing partitions, and create a new one.
- Warning: This erases all data.
4. For Android
Method 1: Check the Hardware Lock Ensure the SD card’s write-protection switch is disabled.
Method 2: Format Using Android Settings
- Insert the SD card into your Android device.
- Go to
Settings>Storage>SD Card. - Tap on ‘Format’.
- Warning: Formatting will erase all data.
Method 3: Use a PC If Android cannot remove write protection, connect the card to a PC and use the methods for Windows, macOS, or Linux.
Preventing Write Protection Issues
- Handle drives carefully to avoid physical damage.
- Use reliable file systems compatible with your operating system.
- Regularly scan drives for errors using built-in tools (e.g., CHKDSK in Windows).


